|
||
| Products Download Events Support Videos | ||
Technical Support
On-Line Manuals
µVision User's Guide
Add Source Files to Project
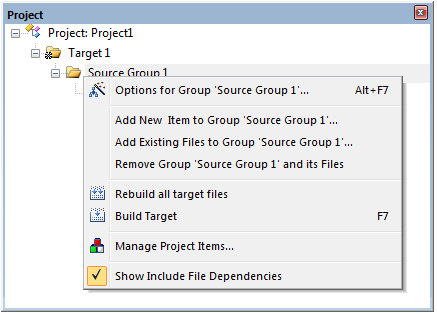
You can add files in several ways to a project. The most common way is to click on a file group in the window Project and use the context menu Add New Item to Group or Add Existing Files to Group.

Add New Item to Group
Using the menu or toolbar
![]() Create a source file with the menu File -
New. This opens an empty file in the editor window. Save the file
(menu File - Save As) to make use of the syntax coloring
feature.
Create a source file with the menu File -
New. This opens an empty file in the editor window. Save the file
(menu File - Save As) to make use of the syntax coloring
feature.
Using the context menu in the Project Window
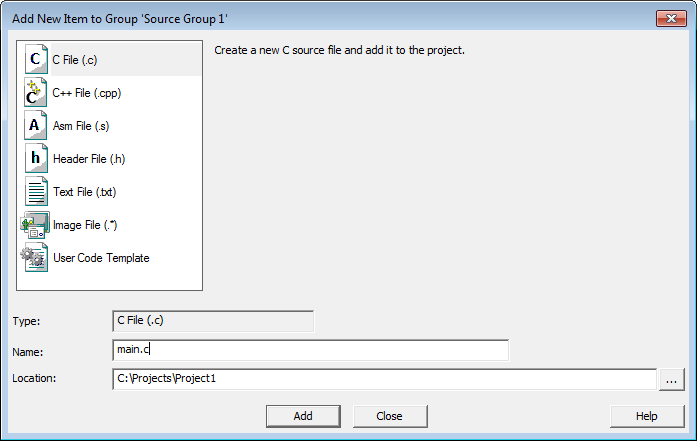
The option Add New Item to Group opens a dialog that allows you to add a new source file.

- Type
-
- C File (.c) - create an empty C source file.
- C++ File (.cpp) - create an empty C++ source file.
- Asm File (.s) - create an empty assembler source file.
- Header File (.h) - create an empty header file.
- Text File (.txt) - create an empty text file. Text files are not included into the target build process.
- Image File (.*) - not applicable for C51, C251, and C166 toolchains.
- User Code Template - create a source file containing function templates for the respective Software Component. Click on the Component to add the user code.
- Name
- Enter or change the file name.
- Location
- Shows the folder where the new item will be created.
Add Existing Files
Using the context menu in the Project window:
- The option Add Existing Files to Group or Add Files to Group opens a standard file dialog that allows you to add one or more files.
Using the dialog Project - Manage - Project Items... - Project Items:
- Select a File Group and click Add Files. This opens a standard file dialog that allows you to add one or more files.
Note
Syntax coloring is controlled by:
- The option Use syntax coloring in the dialog Edit - Configuration - Editor.
- The definitions in the dialog Edit - Configuration - Colors & Fonts.
ProductsDevelopment Tools |
Hardware & Collateral |
Downloads |
Support |
Contact |
